Reduce Angular bundle size by remove unused locale in moment.js (without ng eject)

This is my lab test for remove a moment locale from angular app. This article will show you how to reduce Angular bundled size by remove unused locale in moment.js without ng eject

WARNING: This is my first english article. I’m not good english but i think this should be share to other people.

Prepare a lab data

Just install Angular 7 and moment by this command.

ng new ng7-moment
cd ng7-moment
npm install --save moment

And edit `app.component.ts` to something like this
import { Component, OnInit } from '@angular/core';
import * as moment from 'moment';

@Component({
  selector: 'app-root',
  templateUrl: './app.component.html',
  styleUrls: ['./app.component.css']
})
export class AppComponent implements OnInit {
  time: string;

  ngOnInit() {
    this.time = moment().format('MMMM Do YYYY, h:mm:ss a');
  }
}

And build a production bundle with stats json. by
npm run build -- --prod --stats-json

Next i see how many size of moment.js that include to bundle by
webpack-bundle-analyzer dist/ng7-moment/stats.json
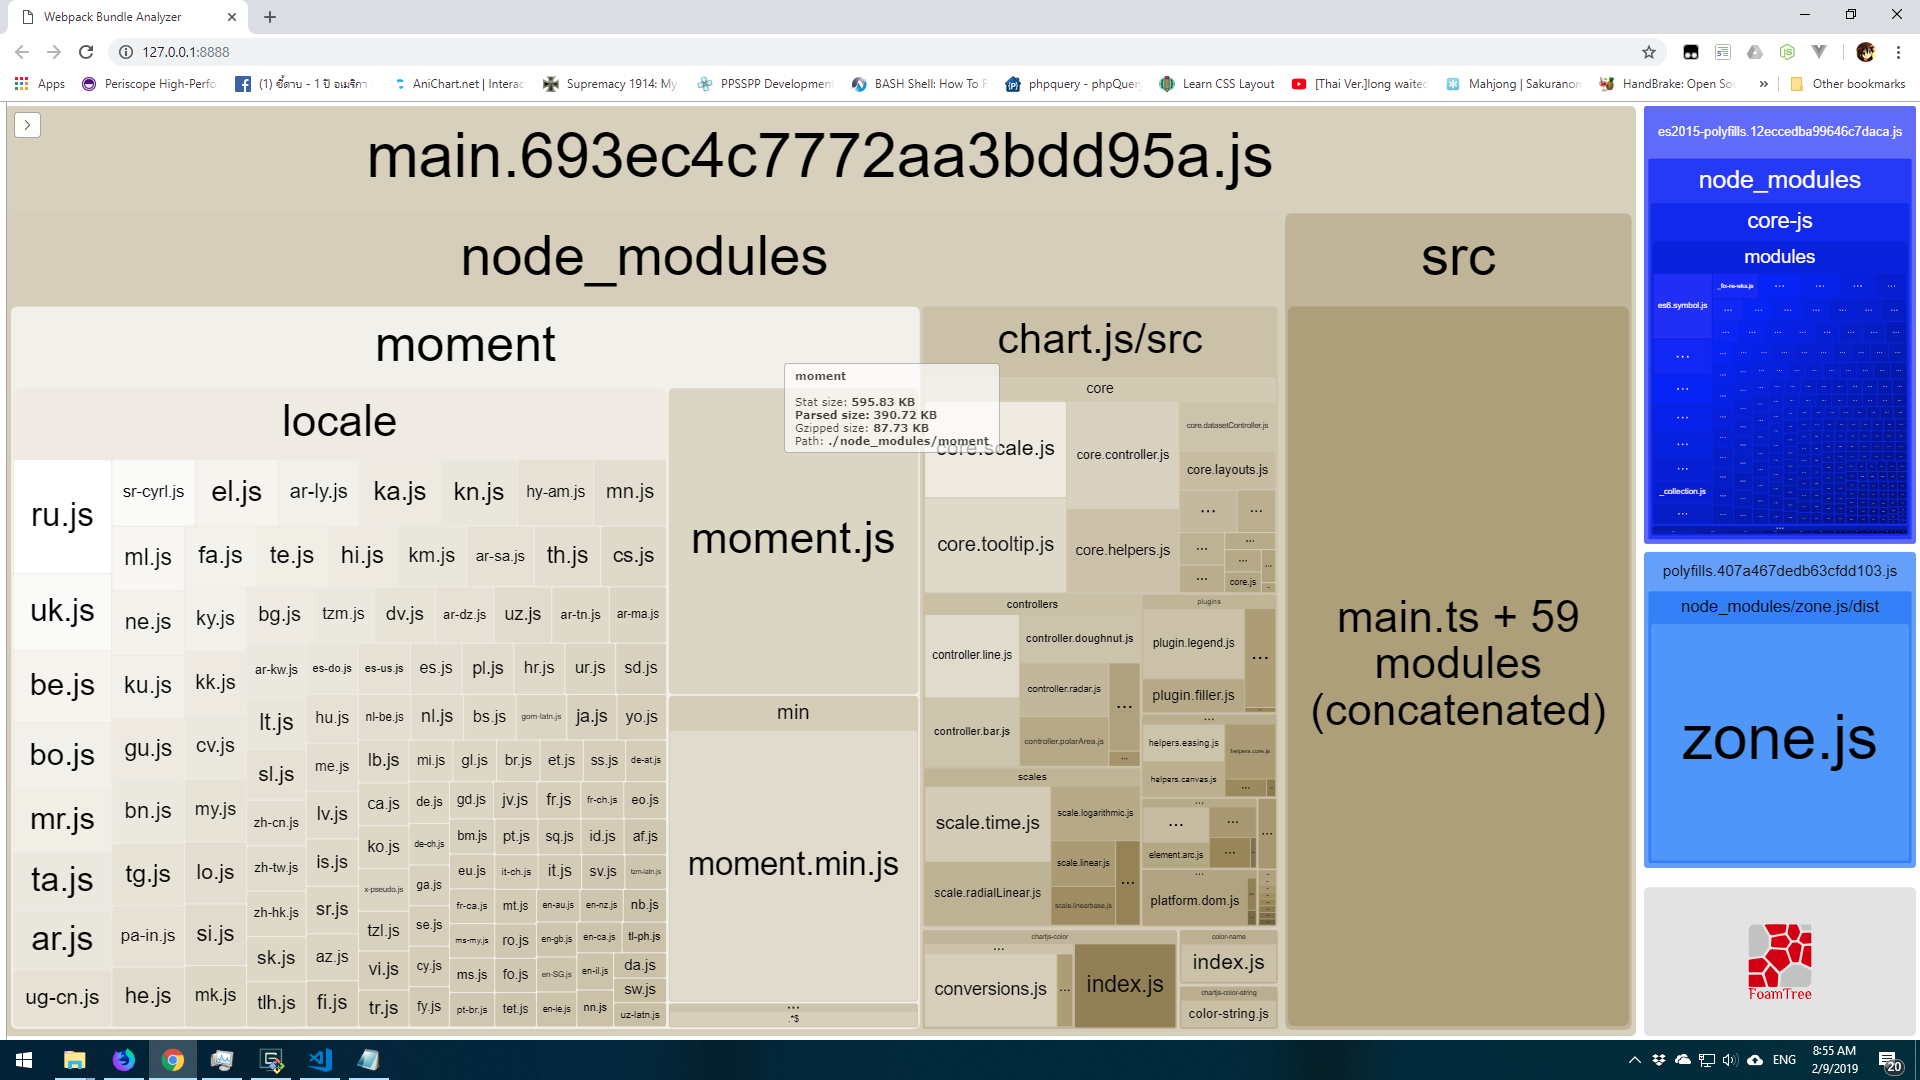
And this i a result

Angular bundle with a full locale of moment.js

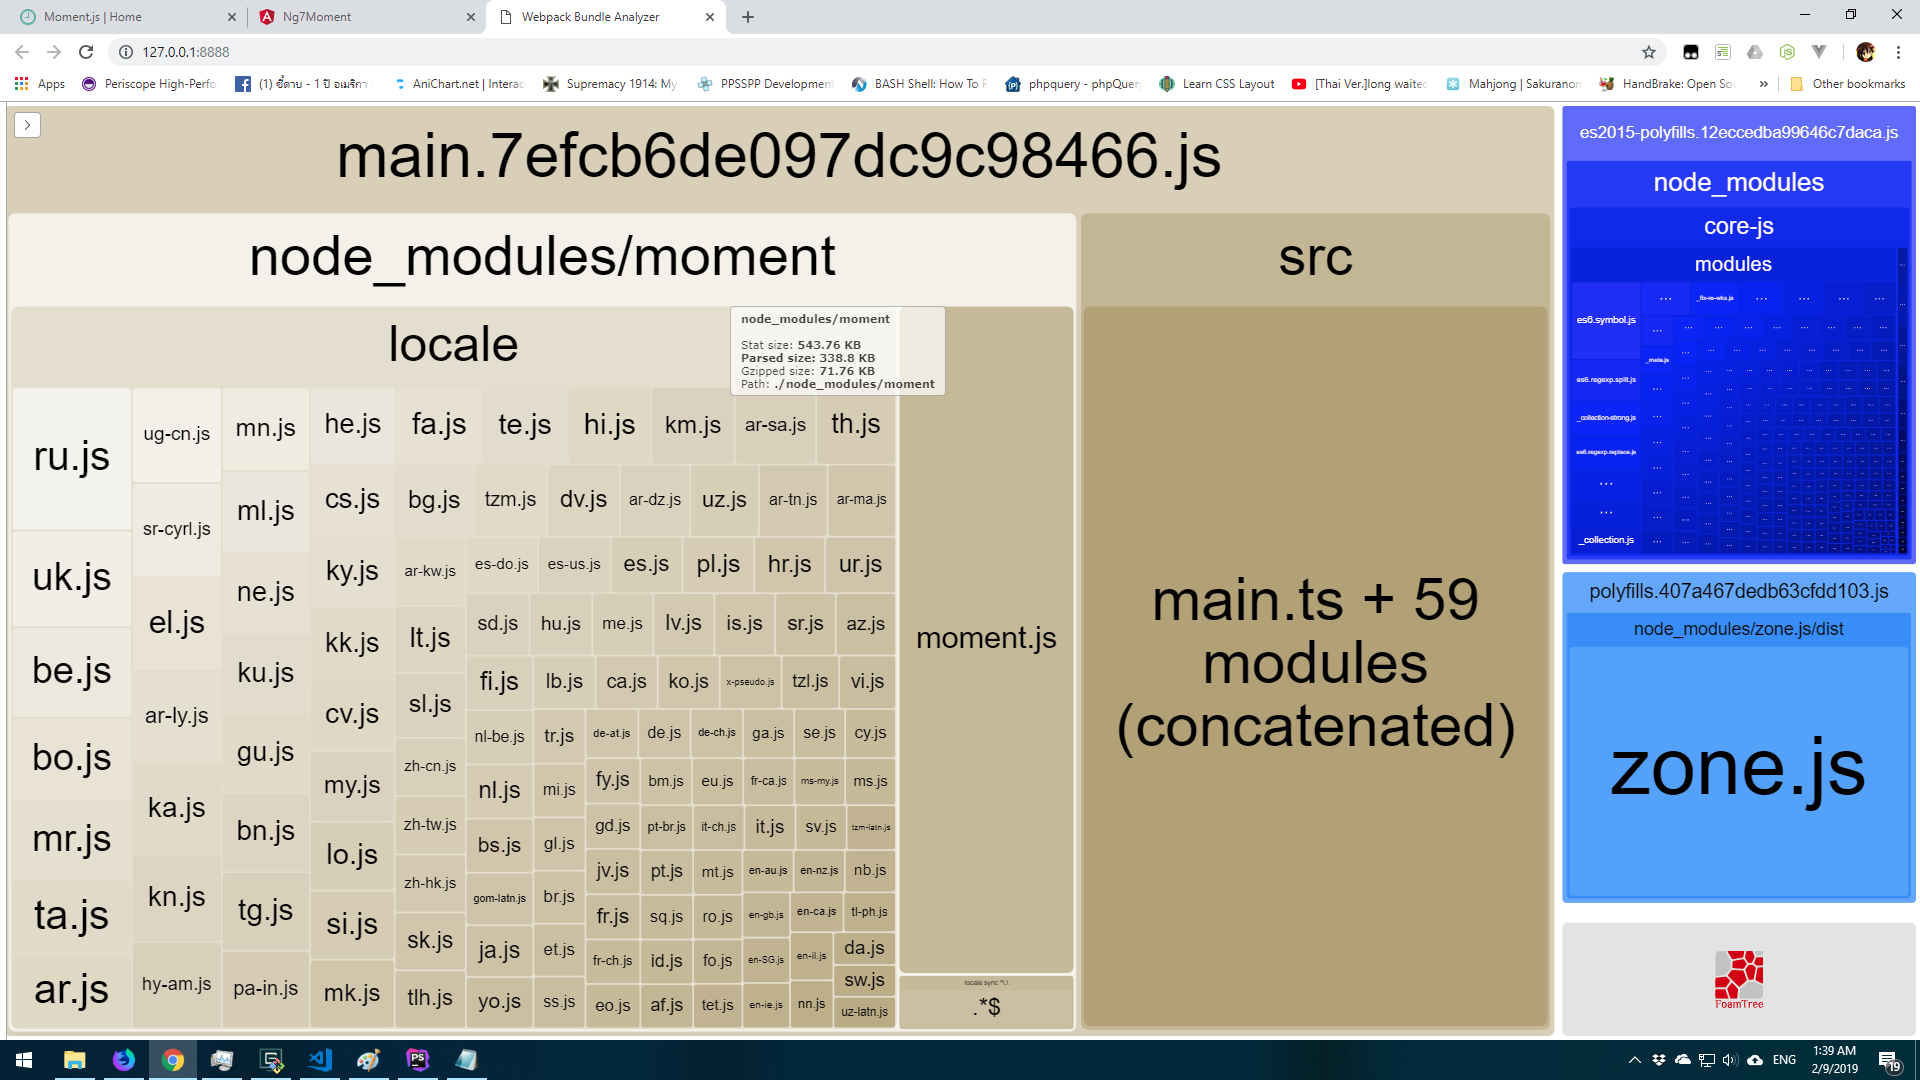
As you can see total size is around 300KB (Gzipped around 70KB).

First try: Import min edition

After I google for solution i found someone suggest that I can import moment.min.js. That file not include any locale data. So i change code to

import { Component, OnInit } from '@angular/core';
import * as moment from 'moment/min/moment.min.js';

@Component({
  selector: 'app-root',
  templateUrl: './app.component.html',
  styleUrls: ['./app.component.css']
})
export class AppComponent implements OnInit {
  time: string;

  ngOnInit() {
    this.time = moment().format('MMMM Do YYYY, h:mm:ss a');
  }
}

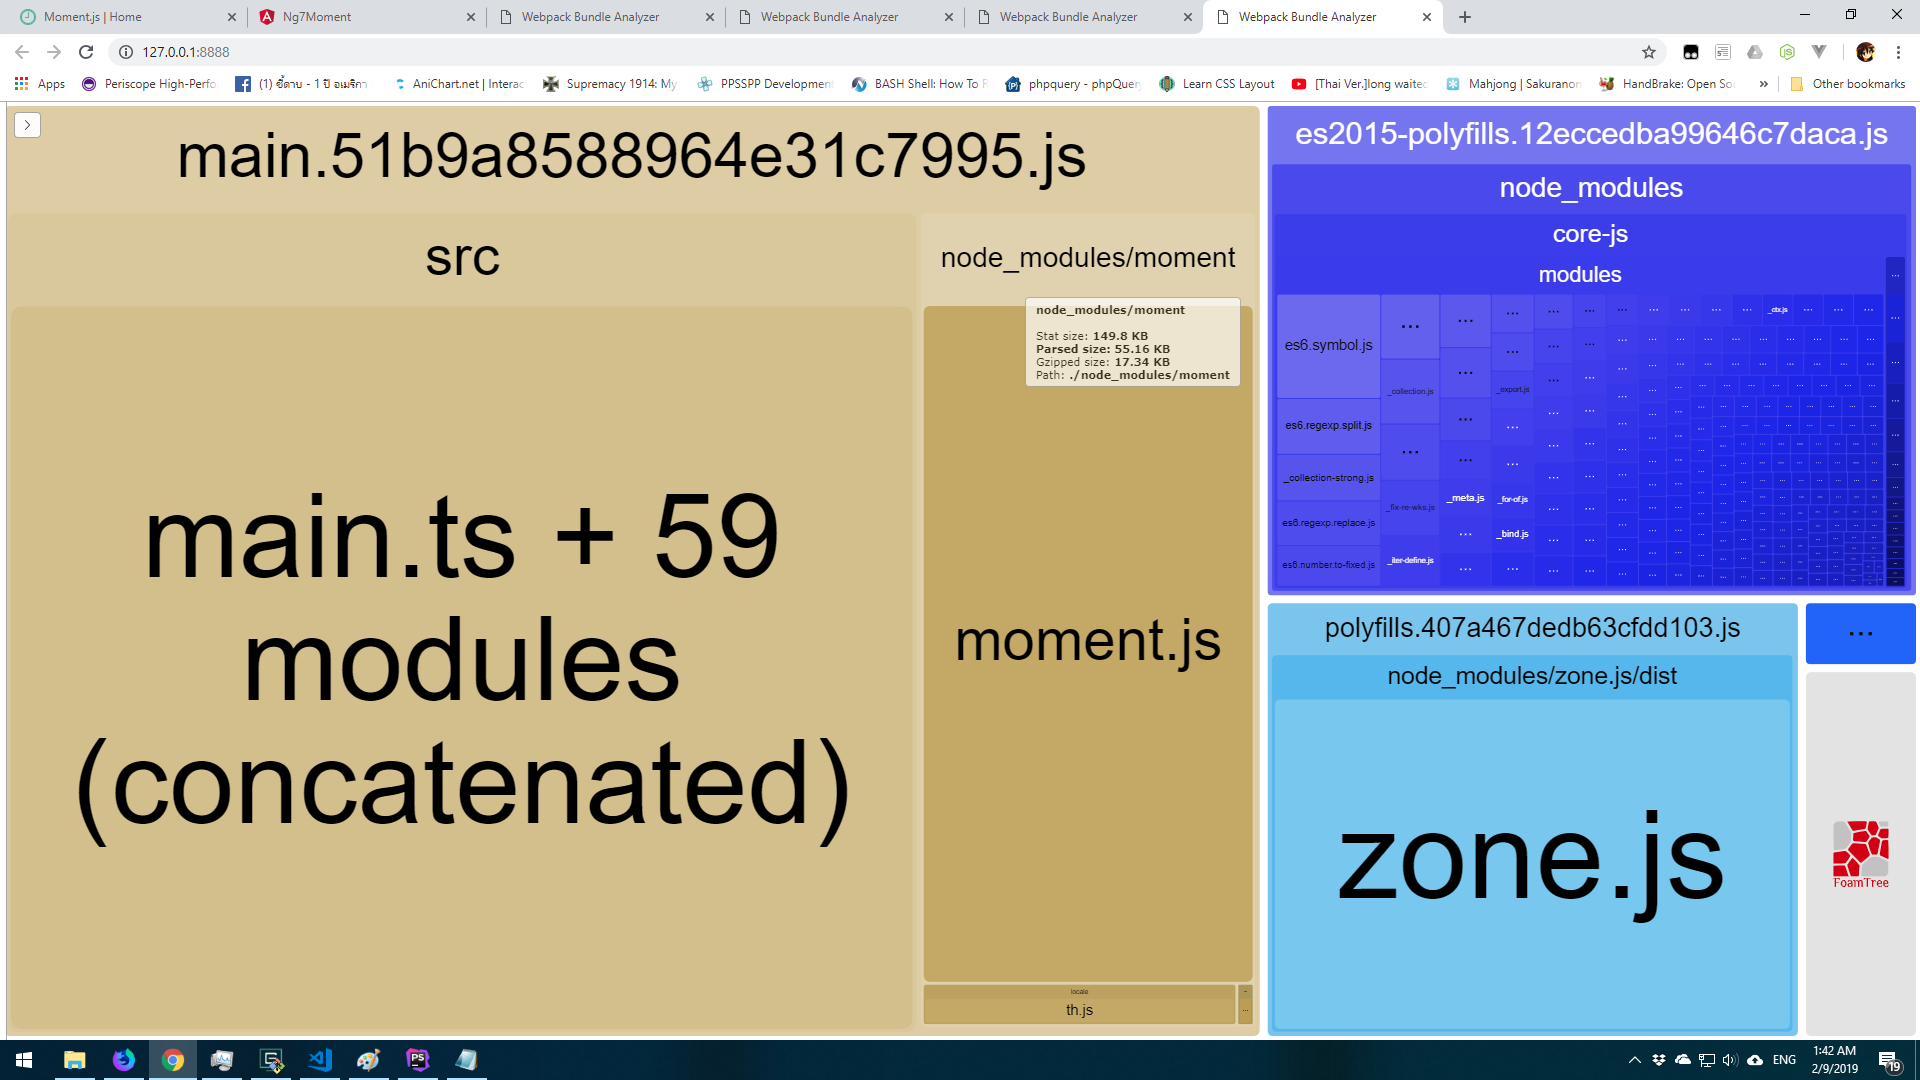
The bundle size after changed is

Bundle size after import min version of moment.js

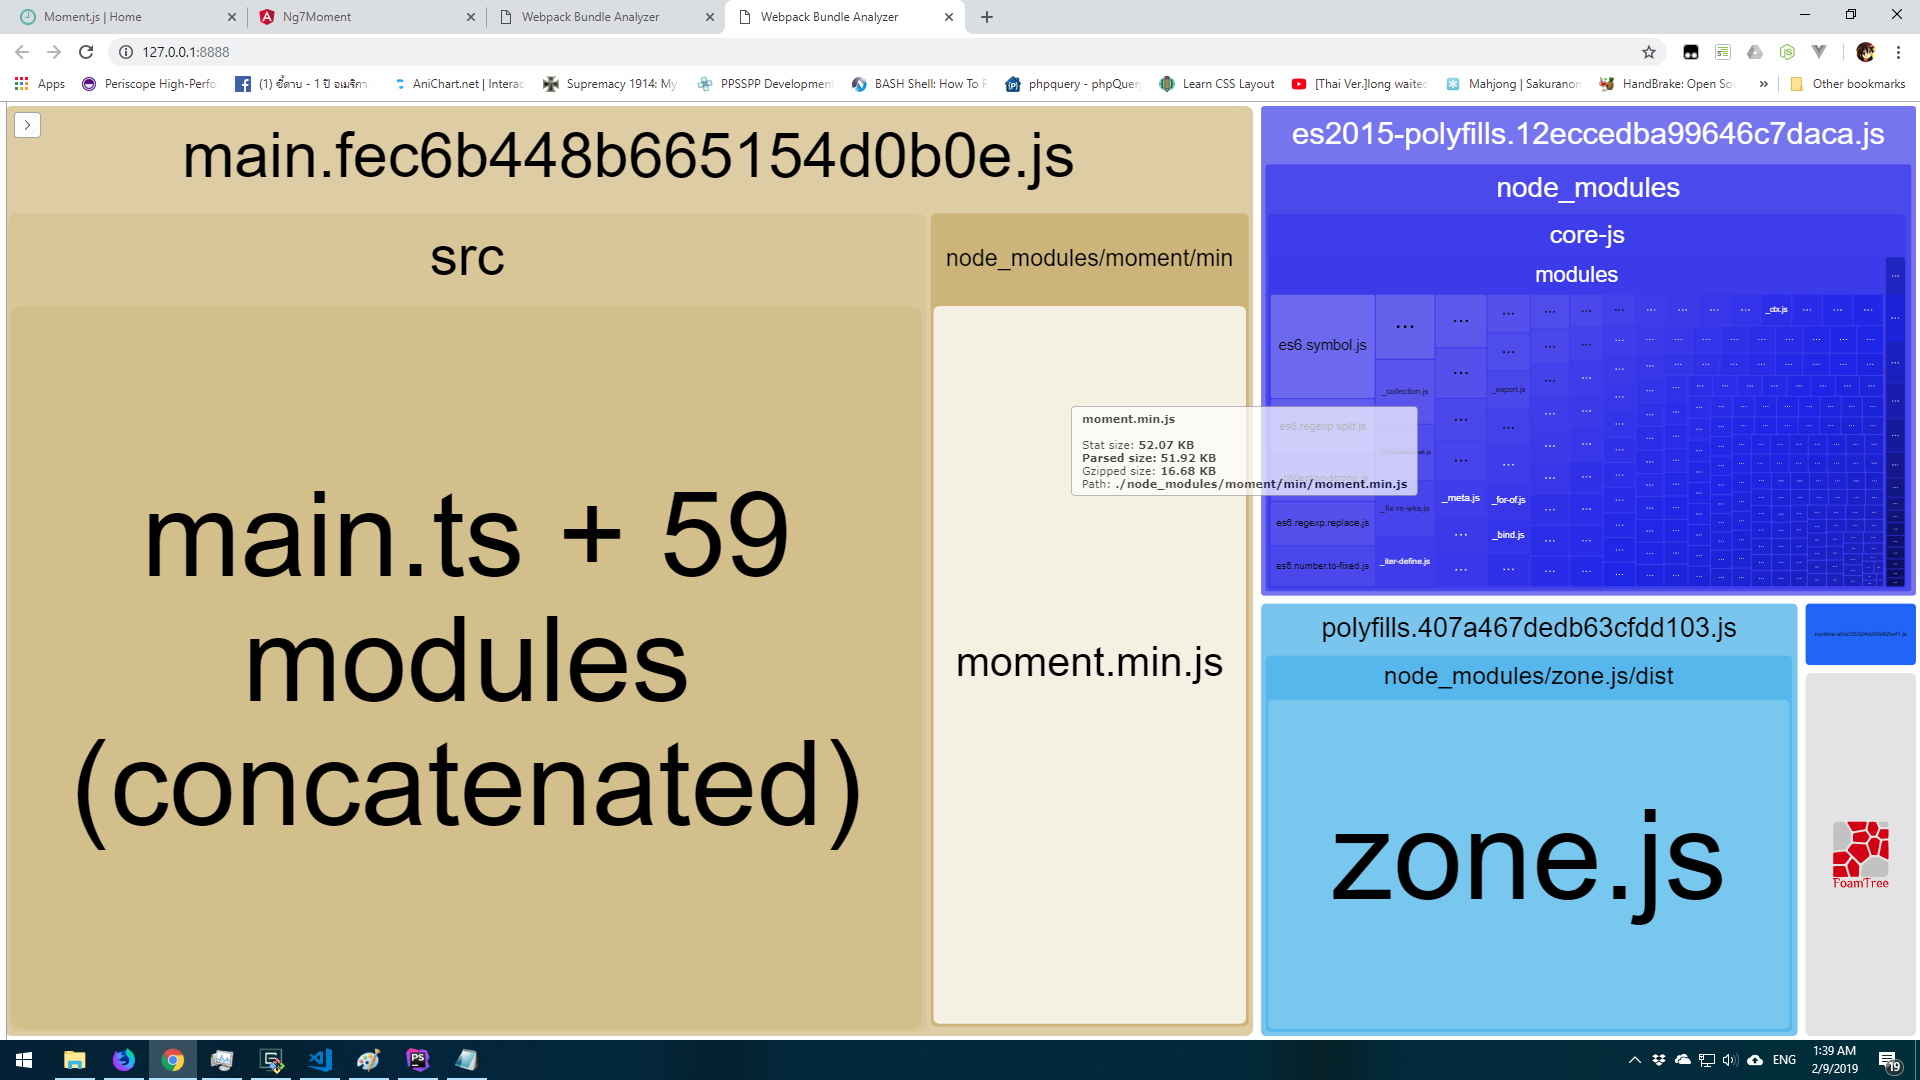
Now size is reduce to around 51KB (Gzipped around 16KB). WOW! At first time I think it works. But when I import a locale data like this code.

import { Component, OnInit } from '@angular/core';
import * as moment from 'moment/min/moment.min.js';
import 'moment/locale/th';

@Component({
  selector: 'app-root',
  templateUrl: './app.component.html',
  styleUrls: ['./app.component.css']
})
export class AppComponent implements OnInit {
  time: string;

  ngOnInit() {
    this.time = moment().format('MMMM Do YYYY, h:mm:ss a');
  }
}

And see a bundled size.

bundle size when import min version of moment.js and import locale
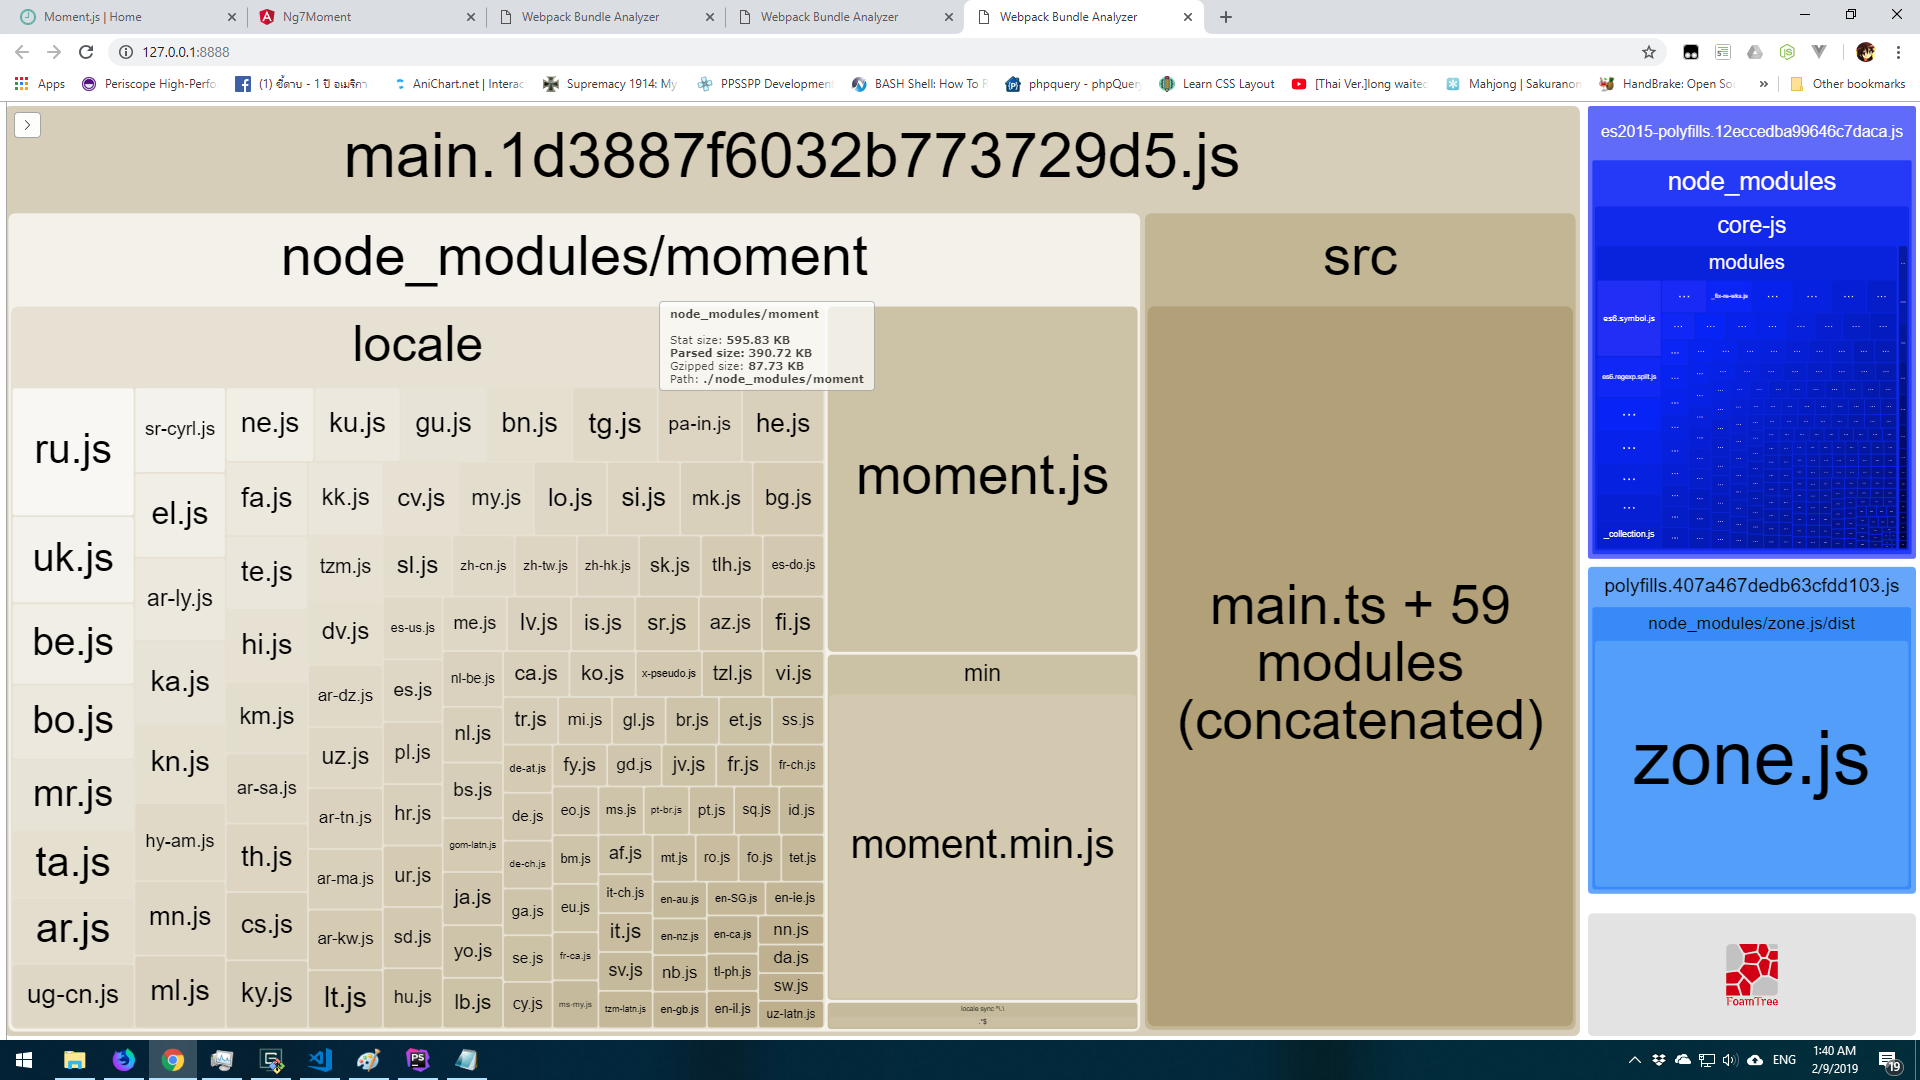
As you see we have 2 moment.js and full locale in bundled (one is full version and another one is min version). And if you import another library that use moment.js like chart.js the size will be like that too.

bundle size after import min version of moment.js and import chart.js

Second try: Use webpack plugins

I search in Google again. I see another solution to eject webpack config and add some plugin to remove locale. But for my personal reason i don’t want to eject angular config, So I will skip this solution for now.

Solution: Remove by Replace locale folders.

I found Angular has a feature that can replace environments file up to version that it build. I think I can use this folder to replace locale folder too. So let try

  1. Create a my locale folder and if you use any locale, copy it to this folder.
    mkdir src/locale
    
    # If you want to use any locale copy it to your locale folder
    cp node_modules/moment/locale/th.js src/locale/
  2. Edit angular.json to replace default locale. file fileReplacements section and add this code like this.
                  "fileReplacements": [
                    {
                      "replace": "src/environments/environment.ts",
                      "with": "src/environments/environment.prod.ts"
                    },
                    {
                      "replace": "node_modules/moment/locale/",
                      "with": "src/locale/"
                    }
                  ],
  3. Build and see a results. (You will see a warning message like “node_modules/moment/locale/af.js” does not exist. But it OK don’t worry it)
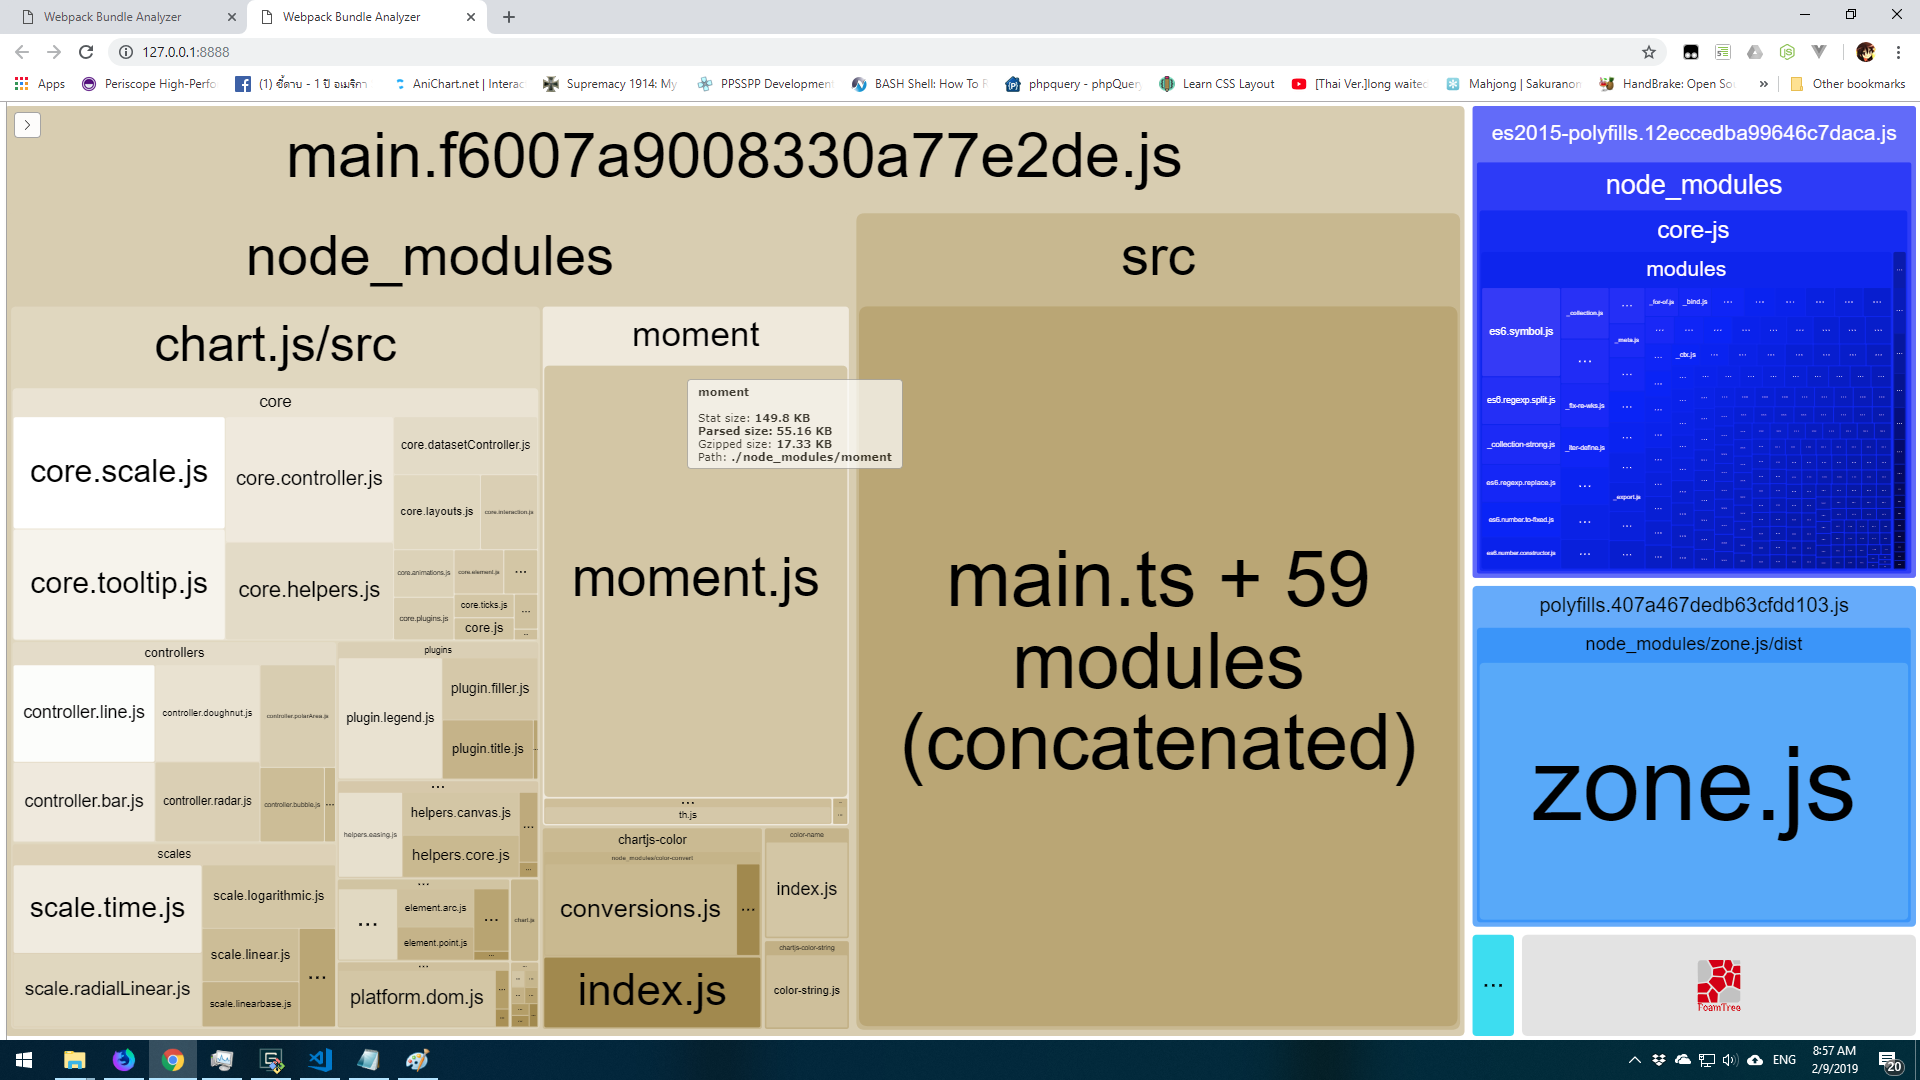
The result is

bundle size after remove unused locale.As you can see the size is around 55KB (Gzipped around 17KB) and no other locale except locale that in new locale folder. even if you import chart.js it still not include unused locale too. Like this

Bundle size after remove unused locale and import chart.js

I hope this will be useful. Thanks for reading.

Cache ทุกคำแปลของ Visual Novel Reader

เป็นวิธีแก้ไข Visual Novel Reader ให้สามารถ Cache คำแปลต่างๆ ที่แปลจาก Google Translator หรือ Bing Translator ได้ โดยตัว Visual Novel Reader นี้เป็น Open Source แต่ไม่มี Source Version Control อย่างพวก SVN หรือ Git (จริงๆ เข้าใจว่ามันใช้ Hg นะ มันคืออะไรไม่รู้เห็นตอน Update และเข้าใจว่าไม่เปิด public) ทำให้ไม่สามารถ pull request ได้ (ถึงทำได้ ก็ไม่ทำ code กาก 55+)

เป้าหมายที่อยากทำคือบางครั้งกลับมาเล่นเกมส์ซ้ำมันแปลไม่ได้ หรืออยากไป route อื่น แต่ข้อความมันซ้ำ ก็ไม่รู้จะต้องไปแปลอีกทำไม บางครั้งเน็ตกากก็รอไปเถอะ โดยปกติตัว Visual Novel Reader จะ Cache ไว้ประมาณ 10-20 คำล่าสุดอยู่แล้ว แต่ถ้าปิดโปรแกรมหาย เลยต้องปรับมันสักหน่อย

ข้อควรระวัง

  1. ไม่รับประกันผล เพราะถ้ามีความรู้ Programming ระดับนึงจะเห็นว่า ผมไปทำให้มัน Clear cache ไม่ได้ เพราะผมไม่ให้มันทำ
  2. ถ้า Ram น้อย อาจจะตายได้ ผมไม่รู้เหมือนกันว่ามันกินเท่าไหร่ แต่ผมกำหนดให้เก็บเรื่อยๆ ไม่มี clear ไม่มีตัด
  3. ผมเขียนให้ตังเองใช้ ดังนั้นขอไม่อธิบายเยอะนะครับ

ขั้นตอนการทำ

แก้ไฟล์ดังต่อไปนี้

  • Library\Frameworks\Sakura\py\apps\browser\managers\_trman.py
  • Library\Frameworks\Sakura\py\apps\reader\managers\_trman.py

(ถ้าเดาจากชื่อ แก้แค่อันล่างก็พอ ก็ได้)

หา class TranslationCache แล้วแทนที่ด้วย code ดังต่อไปนี้

import sqlite3
import rc
class TranslationCache:
  def __init__(self, maxSize=10000, shrinkSize=9000):
    """
    @param  maxSize  max data size
    @param  shrinkSize  data to delete when oversize
    """
    self.maxSize = maxSize
    self.shrinkSize = shrinkSize
    # {unicode text:[unicode sub, long timestamp]}
    self.conn = sqlite3.connect(rc.DIR_APP_CACHE+'/cache.db')
    self.prepare()


  def clear(self):
    pass # i don't want to clear 


  def get(self, key): # unicode -> unicode
    c = self.conn.cursor()
    c.execute('select translate from translations where original = ? limit 1', (key ,))
    r = c.fetchone()
    if r != None:
      c.execute('update translations SET timestamp = ? where original = ?', (self._now(), key ,))
      self.conn.commit()
      c.close()
      return r[0]
    else:
      c.close()


  def update(self, key, value): # unicode, unicode ->
    c = self.conn.cursor()
    c.execute('select translate from translations where original = ? limit 1', (key ,))
    r = c.fetchone()
    if r == None:
      c.execute('insert into translations (original, translate, timestamp) values (?,?,?)', (key ,value, self._now(), ))
      self.conn.commit()

    c.close()
    return value


  def prepare(self):
    c = self.conn.cursor()
    try:
      c.execute('select * from translations limit 1')
    except:
      c.execute('CREATE TABLE translations (original TEXT PRIMARY KEY, translate TEXT, timestamp INTEGER)')
      self.conn.commit()

    c.close()


  @staticmethod
  def _now(): return long(time()) # -> long  msecs


  def _shrink(self):
    pass

ด้านล่างตรงนี้เป็นของเก่า ไม่ใช้แล้ว

เพิ่ม Code นี้ไปแถวๆส่วนที่เค้า import กัน

import rc

หา class TranslationCache แล้วแทนที่ด้วย code ดังต่อไปนี้
class TranslationCache:
  def __init__(self, maxSize=10000, shrinkSize=9000):
    """
    @param  maxSize  max data size
    @param  shrinkSize  data to delete when oversize
    """
    self.maxSize = maxSize
    self.shrinkSize = shrinkSize
    self.data = {} # {unicode text:[unicode sub, long timestamp]}
    self.load()

  def clear(self):
    if self.data:
      self.data ={} # i don't want to clear 
      self.load()

  def get(self, key): # unicode -> unicode
    t = self.data.get(key)
    if t:
      t[1] = self._now()
      self.save()
      return t[0]

  def update(self, key, value): # unicode, unicode ->
    self.data[key] = [value, self._now()]
    #if len(self.data) > self.maxSize:
    #  self._shrink()
    self.save()
    #return value

  def save(self):
    f = open(rc.DIR_APP_CACHE+'/cache.dict','w+')
    f.truncate()
    f.write(str(self.data))
    f.close()

  def load(self):
  	try:
  	  f = open(rc.DIR_APP_CACHE+'/cache.dict','r+')
  	  self.data = eval(f.read())
  	  f.close()
	except:
  	  self.data = {}

  @staticmethod
  def _now(): return long(time()) # -> long  msecs

  def _shrink(self):
    l = sorted(self.data.iteritems(), key=lambda it:it[1][1])
    self.data = {k:v for k,v in l[self.shrinkSize:]}

ปิด Visual Novel Reader เปิดใหม่ ก็ได้แล้ว ต่อไปมันก็จะ cache ตลอดแล้ว

วิธีทำให้เข้าสู่ระบบ WordPress ใน Domain และ SubDomain ในครั้งเดียว

เกริ่นปัญหา

ปัญหาของเรื่องนี้มาจากโพสนี้ครับ สรุปคือเค้าอยากได้ WordPress 2 ตัวที่ใช้ฐานข้อมูลผู้ใช้อันเดียวกัน และเข้าสู่ระบบที่นึง อีกที่จะเข้าสู่ระบบด้วย โดยหลังจากผมลองค้นหาดู พบว่าสามารถทำได้ แต่ทำได้ในระดับแค่ Sub Domain หรือ Sub Directory เท่านั้นนะครับ และ Database ต้องใช้ Database เดียวกัน (ผมเข้าใจว่าสามารถทำได้ถึงระดับที่อยู่คนละ Database แต่ต้องเป็นที่เดียวกันและใช้ Username/Password เหมือนกัน)

วิธีทำ

  1. ก่อนอื่นให้ลง WordPress ทั้ง 2 ที่แบบปกติให้เรียบร้อยก่อน (ถ้ามีแล้ว ข้ามไปครับ)
  2. ลง Plugins “WP-Orphanage Extended” ให้ WordPress ทั้ง 2 ตัว แล้วไปตั้งค่าใส่ prefix ให้เรียบร้อยครับ
  3. ทำการแก้ไข wp-config.php ของ WordPress ทุกตัวดังนี้ครับ
    <?php
    // แทน xxx ด้วยค่าเดิมนะครับ แต่ทุกไฟล์ที่เป็น wp-config.php ต้องเหมือนกันหมด
    define('AUTH_KEY', 'xxx');
    define('SECURE_AUTH_KEY', 'xxx');
    define('LOGGED_IN_KEY', 'xxx');
    define('NONCE_KEY', 'xxx');
    define('AUTH_SALT', 'xxx');
    define('SECURE_AUTH_SALT', 'xxx');
    define('LOGGED_IN_SALT', 'xxx');
    define('NONCE_SALT', 'xxx');
    
    // ตั้งค่า Cookie ให้ Login แล้วใช้ได้ทุก sub domain 
    // อย่าลิมแก้ .example.com เป็น domain ตัวเอง (ไม่ต้อง www)
    // อย่าลืมจุดหน้า domain มันสำคัญมาก ผมไม่ได้พิมพ์ผิด 
    define('COOKIE_DOMAIN', '.example.com'); 
    define('COOKIEPATH', '/');
    define('SITECOOKIEPATH', '/');
    define('PLUGINS_COOKIE_PATH', '/');
    define('ADMIN_COOKIE_PATH', '/');
    
    // ตั้งชื่อ Cookie ที่ใช้เวลา Login 
    define('AUTH_COOKIE','wordpress_auth_cookie');
    define('SECURE_AUTH_COOKIE','wordpress_auth_cookie');
    
    // บอกว่าจะใช้ User จากตารางไหน 
    define('CUSTOM_USER_TABLE','wp1_users');
    define('CUSTOM_USER_META_TABLE','wp1_usermeta');
  4. ทดสอบได้เลยครับ

ความเห็นส่วนตัว

จริงๆคิดว่าถ้าจะทำแบบนี้น่าจะทำเว็บเดียวแล้วแยก Category ของบทความน่าจะดีกว่า แล้วปรับ Theme เอา โดยใช้ Template Hierarchy หรือ Condition Tags ช่วยก็จะได้ 2 ส่วนที่หน้าตาไม่เหมือนกัน แต่ข้อมูลเหมือนกันแล้ว (ช่วยได้ระดับนึงนะ) หรือไม่ก็แยก Post Type ไเลยก็ได้ครับ

WordPress ช้าเพราะ Really Simple CAPTCHA

อันนี้เอามาจากโพสนี้ ไม่ได้เจอเอง คิดว่าน่าจะแก้ได้แล้วเพราะเจ้าของโพสมากดไลค์ แต่ไม่แจ้งผล

really_simple_captcha_property

ปัญหาที่เกิดคือเค้าบอกว่าเว็บช้ามาก เพราะ Really Simple CAPTCHA และขนาดของ plugin ใหญ่มาก (พวก cache ภาพที่ gen แล้วต่างๆ) ตอนแรกผมไม่เชื่อเท่าไหร่ เพราะผมคิดว่ามันไม่น่าจะช้าได้จากตัวนี้ จนกระทั่ง เค้าใช้ P3 Profiler มาให้ดูจริงๆ ผมก็เลยไปลองไล่ดู Code

ผมเดาว่าสาเหตุนั้นมาจากตอน clean up พวกภาพที่หมดอายุต่างๆ ทำให้มันกิน resource จากตัวอย่างคือ loop อ่าน meta file 20000 กว่ารอบ เพื่อลบไฟล์ที่ไม่ใช้ (ยิ่งถ้าใช้พวก NFS นะ โคตรช้า)

Solution

  1. เปิดไฟล์ really-simple-captcha.php หา function cleanup ให้แก้ไขเป็นดังนี้
    	public function cleanup( $minutes = 60 ) {
    		return 0;
    	}

    (ปิดการทำงานของ clean up เพื่อไม่ให้เว็บช้า เราจะย้ายไปทำใน background แทน)
  2. ให้สร้างไฟล์ชื่อ cleanup.php ข้างๆ really-simple-captcha.php มีเนื้อความดังนี้
    <?php
    $minutes=60;
    $dir = trailingslashit( path_join( dirname( __FILE__ ), 'tmp' ) );
    $dir = str_replace( '\\', '/', $dir );
    $dir = preg_replace( '|/+|', '/', $dir );
     
    if ( ! @is_dir( $dir ) || ! @is_readable( $dir ) )
            return false;
     
    $is_win = ( 'WIN' === strtoupper( substr( PHP_OS, 0, 3 ) ) );
     
    if ( ! ( $is_win ? win_is_writable( $dir ) : @is_writable( $dir ) ) )
            return false;
     
    $count = 0;
     
    if ( $handle = @opendir( $dir ) ) {
            while ( false !== ( $filename = readdir( $handle ) ) ) {
                    if ( ! preg_match( '/^[0-9]+\.(php|txt|png|gif|jpeg)$/', $filename ) )
                            continue;
     
                    $file =  $dir . $filename ;
                    $file = str_replace( '\\', '/', $dir );
                    $file = preg_replace( '|/+|', '/', $dir );
     
                    $stat = @stat( $file );
                    if ( ( $stat['mtime'] + $minutes * 60 ) < time() ) {
                            @unlink( $file );
                            $count += 1;
                    }
            }
     
            closedir( $handle );
    }
     
    ?>

    (เป็นไฟล์สำหรับ clean up แบบ manual)
  3. สร้าง cronjob เพื่อสั่งให้ cleanup.php ทำงาน (หรือเข้ามาสั่งเองทุกวันก็ได้ แต่ถ้าสั่งช้า มันจะกินพื้นที่ HDD เยอะขึ้นเรื่อยๆ)

จบ เอาไปทดสอบได้เลยครับ

[บันทึก] R&D เทคนิคป้องกันการดูดรูปภาพจากเว็บ (ขโมยรูป)

สืบเนื่องมาจากโพสนี้ครับ คือ ณ วันที่เขียนบทความนี้ เว็บ www.Nekopost.net (ตอนเข้าต้องมี www. ทุกครั้งไม่งั้น ajax เค้าพัง) ใช้วิธีป้องกันการขโมยรูปโดยใช้วิธีเอารูปจริงๆ ไปใส่ในภาพที่มีพื้นหลังสีขวา และภาพใหม่นั้นขนาดใหญ่กว่าภาพเดิม โดยใส่แบบสุ่มตำแหน่ง แล้วใช้ JS+CSS แสดงเฉพาะส่วนที่เป็นภาพหลักตรงๆ ผลคือหมาไฟ (Firefox) ผมมีโอกาศเพี้ยนเวลาที่มันกิน RAM ไปเยอะแล้วไปอ่านการ์ตูน (หรืออาจจะเป็นเพราะผมมีนิสัยกด END รัวๆเพื่อให้มันโหลดภาพทั้งหมดมาก่อนแล้วค่อยไล่อ่านรึเปล่า) ดังนั้นผมเลยเสนอวิธีไป (จริงๆวิธีที่ 1 คิดได้ตั้งแต่วันแรกที่เห็นมันทำแล้วแหละครับ แต่ไม่ได้ proof เป็น code สักที เพราะผมอยากพยายามหาวิธีที่กันการคัดลอก และดีกว่าที่เค้าใช้อยู่ โดยเชื่อว่าวิธีที่เค้าใช้ไม่ได้ดีที่สุด)

วิธีที่ 1 ใช้อีกภาพเป็น Key แล้วใช้ XOR กับต้นฉบับ

อันนี้เป็นวิธีแรกที่ผมมี Code อยู่ที่นี่ครับ หรือ Download พร้อม Sample Data  ที่นี่ แนวคิดดังนี้

  1. สร้างภาพ Key ขึ้นมา เป็นภาพเล็กๆ สมมุติขนาด 64*64 px โดยแต่ละจุดสร้างจากการสุ่มสีขึ้นมารวมเป็นภาพมั่วๆ
  2. เอาแต่ละจุดของภาพต้นฉบับไป XOR กับภาพ Key ทีละสีเลย โดยใช้คุณสมบัติจาก
    ถ้า a XOR b = c แล้ว c XOR b = a
  3. ที่ Browser ใช้ Canvas ทำ Pixel Manipulation เพื่อทำการ XOR กลับมา
  4. แต่ถ้าสั่งแสดงที่ Canvas เลย ตัว Google Chrome มันเทพเกิน สามารถคลิกขวาที่ Canvas แล้ว Save As ได้ จึงต้องแปลงเป็น Data URI แล้วทำเป็น Background ให้ Div แทน

แต่เมื่อลองทำแล้ว เกิดปัญหาดังนี้

  1. Browser ต้องใหม่ระดับหนึ่ง (เพราะใช้ Canvas)
  2. มันกิน RAM มากๆ เวลาถอดรหัส อาจจะมากกว่าภาพใหญ่ของ Nekopost อีกต่างหาก
  3. ถ้าใช้กับ Mobile ที่ CPU ช้า อาจจะต้องรอนานกว่าภาพจะถอดรหัสเสร็จ (ระดับวินาที) และค่อนข้างกินแบตเตอรี่
  4. บน Tablet ผม (Samsung Galaxy Note 8) มีปัญหาว่า canvas เหมือนมันขี้เกียจทำบางจุด หรือประมวลผลผิดไม่รู้ทำให้มี Noise เป็นจุดสีๆเกิดขึ้นบนภาพ ทั้งๆที่บน PC ไม่เจอ

ดังนั้นแนวคิดนี้ผมเลยตกไป

วิธีที่ 2 สลับตำแหน่งของภาพ แนวคิดแบบตัวต่อจิ๊กซอว์

เป็นวิธีที่ 2 ที่ผมคิดมาแทนอันแรก ซึ่งตกไปในเรื่อง Performance และการใช้งานจริง วิธีนี้สามารถดู Code ได้ที่นี่  หรือ Download พร้อม Sample Data ที่นี่ แนวคิดดังนี้ครับ

  1. แบ่งภาพออกเป็น x คอลัมน์  y แถว โดย x ต้องหารความกว้างภาพลงตัว และ y ต้องหารความสูงภาพลงตัว (ถ้าไม่ลงตัวจะเกิดปัญหาภาพไม่ต่อกัน ดูไม่งามได้)
  2. สุ่มนำภาพแต่ละช่อง ไปวางมั่วๆบนภาพใหม่ แล้วสร้าง meta file บอกว่าเดิมนั้นแต่ละส่วนอยู่ตรงไหน
  3. เวลาแสดงก็อ่าน meta file มาสร้าง div ข้างในแทนแต่ละ block ให้แสดง background ของแต่ละช่องให้ถูกต้อง

ตัวอย่างภาพที่ผมทำ จะประมาณนี้

Before ShuffleBefore After ShuffleAfter

วิธีนี้หลังจากลองในเบื้องต้น พบว่าใช้ได้ OK เลย แต่มันมีปัญหานิดหน่อยใน Code ของผม คือมีส่วนที่ยุ่งเกี่ยวกับ DOM ที่ผมไม่ได้ Optimize อยู่ ดังนั้นถ้าแสดงภาพเยอะๆ จะทำให้เปิด Browser มาแล้วเหมือนค้าง หลังจากนั้นจะเร็วแล้วครับ

ผลจากวิธีที่ 2 สามารถลด RAM ได้มากกว่าวิธีที่ Nekopost ใช้ปัจจุบันเยอะมากครับ

memory_report

จากตาราง แสดงดังนี้

  1. PID 9532 เป็นวิธีจิ๊กซอว์ของผม
  2. PID 456 เป็นของ Nekopost
  3. PID 2756 เป็นภาพต้นฉบับจากเว็บคนแปลเลย (แต่ผมนั้นใช้ Adblock ทำการ block ส่วนของ social media กับ comment ทิ้ง เพื่อให้ขนาดใกล้เคียงนะครับ เหลือพวกภาพ Header กับโครงไว้)

ผลดังนี้ครับ

  • จะเห็นวิธีผมกิน RAM ใกล้เคียงกับขนาดต้นฉบับค่อนข้างมากครับ (เทียบ 9532 กับ 2756) แต่ถ้าเทียบแค่ภาพจริงๆ ต้นฉบับน่าจะน้อยกว่าผม
  • วิธีผมเมื่อเทียบกับ Nekopost ลด RAM เยอะมาก (จริงๆ Nekopost เพิ่ม RAM ที่ต้องใช้มากกว่า) จากเกือบ 400MB เหลือ 220MB (ทำไมภาพแค่ 23 ภาพมันแดก RAM เยอะจังวะ?)